How to look like Marilyn Monroe… (Secrets revealed from her personal Makeup Artist Allan ‘Whitey’ Snyder)

Now everyone knows how amazing Marilyn Monroe was and she is extremely well known for always looking gorgeous (A true style icon) but what most people don’t realise is that without the genius of her personal makeup artist, she was quite plain and looked nothing like you see in the photographs. Through a vast understanding of contouring and highlighting her makeup artist was able to transform her from a very pretty but plain woman into one of the most iconic Hollywood beauties ever.

So in this blog, I’m going to attempt to explain step by step, how this transformation was achieved using the same tips and tricks that Whitey used when doing Marilyn’s makeup. A video tutorial will follow shortly.

The most important factor when applying makeup, especially when trying to recreate a 1940’s or 1950’s style is above all the skin as it was always flawless.

STEP 1: SKIN

The reason Marilyn’s skin always looked flawless was partly down to the makeup application but largely due to her skin care regime. Makeup applies better on moisturised skin, and although Marilyn used to moisturise with petroleum jelly (vaseline), you can achieve the same by moisturising routinely and using a silicon based primer (such as GOSH Velvet Touch Foundation Primer) before applying your makeup. This will smooth out any imperfections and keep the makeup fresher and longer lasting.

When selecting a foundation choose the lightest matt shade suitable for your skin tone (preferably full coverage) and apply all over as normal (remembering to blend into the neck and ears). Using a concealer that is a very similar colour to the base foundation, apply to under eye area and any imperfections visible. Due to female hormones we also tend to be quite red around the nose/nostrils, mouth and chin so apply to those areas if necessary before setting with a light dusting of translucent powder.

STEP 2: CONTOURING

Marilyn was very self conscious of her forehead as she thought it was quite wide and she also disliked the shape of her nose as it is naturally quite round and bulbous at the tip so contouring played an important part of her makeup routine. Contouring was used to exaggerate any existing shadows so slim down certain parts of the face, this can be achieved by using either a bronzer or a foundation which is approximately 3-4 shades darker than your natural skin tone and applying it to the following areas: under the jawline and blending down the neck, below the cheekbones, temples and blending up into the hairline and also down the side of the nose – IT IS IMPORTANT THAT YOU BLEND THIS IN WELL OR YOU WILL JUST LOOK LIKE YOU HAVE A DIRTY FACE LOL!

 STEP 3: EYEBROWS

Miss Monroe’s eyebrows were almost like an upside down V in shape with the arch being fairly central, this was another trick she used to try draw attention away from her wide forehead. To achieve this look you can either use an eyebrow pencil or eyeshadow and brow brush to define and give shape. For best results I tend to use eyeshadow and a brow brush as you can achieve a closer match to your brow colour by combining shades of brown/cork.

STEP 4: EYES

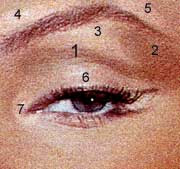
Apply an off-white eyeshadow over the lid and all the way up to the brow. With a light brown eyeshadow, apply to the crease and up to the brow on the outer corner of the eye (1&2). Apply a frosted white/off white shadow to the inner corner of the eye, the middle of the lid, under the brow and just over the top of the brows (3,4,5,6 &7).

To line the eye, Whitey would apply a white pencil to the lower water line of the eye and also draw a white triangle at the outer corner of her eye which he would then blend outwards. To complete the look he would line her upper lid (close to the lash line) with a BROWN eyeliner and then add a little liner to her bottom lashes to create a shadow effect from her lashes (as shown in red). You can also add a gold eyeshadow over the top edge of the upper liner to make it a little more glamorous (but make sure it is not thick as it may start to look over the top). Coat lashes with black mascara and add strip lashes to the outer corner of the eye. Last but not least, Whitey also used to add a small dot of red lipliner to the inner corner of the eye as this will contrast with the whites of the eye and make them appear brighter.

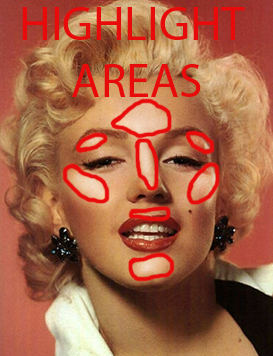
STEP 5: HIGHLIGHTING

Apply a shimmery highlighter or eyeshadow (I use Benefit High Beam) to the top of the cheekbones, down the centre of the nose, centre of the forehead, browbone, chin and above the cupids bow (after lipstick application).

STEP 6: LIPS

For Marilyn’s perfect pout a combination of 3-5 different shades of red with bluish tones were used (this was because Technicolor had a tendancy to make everything look more orange in film). Before applying the lipstick however, her makeup artist would draw just above the cupids bow with a white eyeliner pencil and then blend in to give the illusion of a fuller upper lip. A dark/brick red liner should then be applied to the lips, just outside the lip line and rounding off any sharp angles. A lighter shade of red was used in the middle of the lips and then the darker shades towards the edges to make the lips look more voluptuous. To finish, apply a little shimmer to the cupids bow and the very centre of the lips.

Notice how the lips are nice and rounded (this was very common for the era) and also how the corners of the top lip are wider than the lower lip.

STEP 7: BEAUTY MARK

By now you should have the desired effect but there is one thing missing… The iconic Marilyn Beauty Mark. To achieve this is very simple – some people will use a black pencil (which is fine but tends to look a little unnatural). I tend to use a very small brush with some dark brown eyeshadow to dot it on the skin but you could also use a brown pencil (experiment and see what works best for you) then as with everything, apply a small amount of powder to set the look and you are good to go.

1940s Hollywood for Heroes Charity Calendar – Now on sale!

Front cover copy2 copy

Ok, so at the beginning of the year I decided that it would be a great idea to put together a 1940’s Hollywood Inspired Calendar to raise a bit of money for Help for Heroes. I found a photographer and after an extensive casting process I found some absolutely amazing models. The whole process has been lots of effort and hard work with it’s fair share of ups and downs but the calendar is finally finished and I can definitely say it has been extremely worthwhile.

Jess

I would like to say a massive thank you to everyone involved as you have all played a huge part in turning my ideas into something really special which will hopefully be something new to a lot of people but also bring back some happy memories for others.

Keira copy

If you would like to purchase your own copy please visit: Hollywood for Heroes Calendar 2012/Purchase

Sam and DJ copy

What is my skin tone?

Okay, so following my last post I have been asked how to determine whether your skin is warm or cool toned.

It is important to know what skin tone you are as it will give you a better idea of what colours will look best on you. It is important to know which shades will enhance your skin colour as certain colours on the wrong skin tone can make you look ill. There are many tests that can be done to determine your skin tone and these should be done in natural light to get accurate results. There are exceptions but the main thing to remember is that if you like a colour and feel comfortable in it, then wear it 🙂

The Vein Test

With your palms facing upwards, clench your fists and have a look at the veins. If they appear to be blue you are cool toned, if they are green you are warm toned.

The Fabric Test

Take a piece of fabric in the following colours – black and brown or white and off-white, looking in a mirror hold the fabric against your skin, if black and white look better against your skin you have a warm skin tone, if brown and off-white look better then you have a cool skin tone.

The Jewellery Test

Take a piece of gold jewellery and a piece of silver jewellery, while looking in a mirror hold the jewellery against your skin (one at a time), if the silver looks better you are cool toned and if the gold looks better you are warm toned.

Genetic Factors

There are many genetic factors that can determine your skin tone but please note, there are some exceptions so this method should be used as a guideline in conjunction with the above tests.

HAIR:

Ash blonde, dark brown, or black. (With blue or silver tones) = cool skin tone
Golden or reddish brown (think chestnut), golden blonde, red, strawberry blonde, black. (Yellow, orange, golden, red undertones) = warm skin tone

EYES:

Amber, golden brown, hazel, or green = warm skin tone
light blue, grey, dark brown, or black = cool skin tone

So what difference does it make?

Warm skin tone
If you have a warm skin tone your foundation should be yellow based and earth tones like olives, brown, and rusts probably look amazing on you. Blushes should be peachy and makeup, like your skin should have gold and yellow undertones.

If you have a cool skin tone you foundation should be pink based and jewel tones like blues, violets  and emerald green should look amazing on you. Blushes should be rosy and makeup, like your skin should have blue and rosy undertones.

There are some people who have a neutral skin tone and can basically wear any colour they want, however most people with a neutral skin tone tend to sway favourably one way.

I hope that has helped you understand what colours will best compliment your skin tone to allow yourself to look like your best gorgeous self 🙂

Question?

Question/

I have never really used lipstick before but now I would like to a bit when I go out clubbing and stuff. I looked around and found them to be quite a bit of money so I want to be sure the lipstick is going to work before I buy some. That’s why I’m here!

I would like a red but I’m not sure what shade to go for, is there one that will work best with my face? What’s brands are the best? Also I have a winter ball to attend this weekend. I have a red dress for it. Should the lipstick match the colour of the dress or not?

Thank you! Xxxx

Answer/

To chose the right colour red for you, the first thing you need to do is figure out what skin tone you have (alabaster, fair, medium, olive, brown or black) and whether you have a warm or a cool complexion. (Warm tones tend to look better in gold jewellery and cool tones tend to look better in silver jewellery)

As a general rule;

Alabaster and fair skin tends to suit red with blue undertones and corals. (blue based reds should have no hint of orange or pink and is similar to what Dita Von Teese usually wears)

Medium and olive skin tends to suit orange based reds. Blue based shades can also work but as orange based reds tend to be more vibrant they can really pop against medium skin tones.

Darker skin tones tend to suit burgundy or purple based red lipsticks as the darker shade of red is more flattering to the skin tone.

Warm skin tones tend to suit wine reds and cool skin tones tend to suit blue based reds.

The above is just a general rule and like most rules there are exceptions so the best thing to do would be to go to your local shops and have a play to see which ones look better against your skin tone and how they feel (some can feel quite dry or waxy so the best brand is more a personal preference). As red is a colour that tends to bleed, make sure you use a matching or nude lip liner to keep edge defined. Also, if you feel that the red is too bright try add an extra layer of mascara or darken your eye makeup slightly as this will draw attention away.

Remember the most important thing to do is not be afraid of experimenting and have fun trying the different shades out until you find one you are comfortable with 🙂

Haley x

Makeup Your Questions Answered

Makeup Your Questions Answered

A few weeks ago I set up a facebook page especially designed for you. Together with two other very talented, professional makeup artists, we are offering our service to answer all you makeup related questions and give you tips and tricks of the trade to enable everyone to look like their very best self.

Please check out our facebook page and feel free to contact us if you have any questions that we can help with 🙂

Haley Ryan Makeup Artist